If you
are in need of a Power Supply Unit (PSU) to resurrect your beloved Apple IIe, your
may want to share my experience here. Among my dormant Apple II collections, my trusty enhanced IIe, like many
others, had its Astec PSU gone south years ago and was in storage since then.
The coming back of “Retro Gaming & Computing” had me hooked and
so I decided to bring it and my other "good-old-days" of personal computing back to
life.
The Power Problem
Problems
with PSU is common among vintage personal computers such as Amiga, Apple,
Commodore, Tandy, etc. and clones alike. Many were caused by leaky or aging
capacitors. The Astec and DynaComp units common among Apple II’s are no
exception but they were manufactured over 30 years ago and are no longer
available nowadays except on the used market with questionable reliability and at hefty prices.
Hobbyists have been looking into using PSU of desktop PCs and adapter to connect the PSU
to the Apple II motherboard but in most cases the bulky PSU won’t fit inside
the Apple II case. Even if it did, the Apple II’s require -5V in addition to
+5V, ±12V from the PSU to run but ATX PSU manufacturers have started dropping -5V since ATX12V v1.2 (published in 2002) because it is there only for the older PC ISA peripherals. That means you’ll need an extra single output DC-to-DC voltage converter (Note 1), like a linear voltage regulator, and some
soldering to make -5V available. Besides, the PSU's 3.3V source is literally wasted.
Others
that want to preserve the original look and feel of the Apple II may repair the
broken PSU by replacing the damaged capacitors, coils and/or other components but that would be
for the technically skilled. If the PCB (Printed Circuit Board) is badly
"burned" by the ugly capacitor you may as well forget about fixing it unless you
are an expert. Sourcing the right component(s) could be another problem. Still, even if all went well, there is no guarantee how much
longer the repaired PSU will last. And more, you are still stuck with your original PSU's wattage.
Modern technology is so amazing that now you could find open-frame switching PSUs so small that will fit nicely inside the original Apple II PSU's case, replacing the old PCB and circuit components alike, and with performance exceeding that of the original PSU in every respect. Of course you still want a quad voltage (±5V, ±12V specifically) unit to keeps things simple and reliable. Two examples are SDS60UQ02 (60 Watts) from XP Power and SBU60-401 (60 Watts) from Sinpro. They and others share a more-or-less common design known as the “SBU60” series. Other examples with bigger wattages are REL-70-4004 (70 Watts), GRN-80-4002 (80 Watts) and REL-110-4004 / GRN-110-4002 (110 Watts) from Integrated Power Designs; and VLT80-4000 (80 Watts), VLT100-4000 (100 Watts) from EOS Power. You’ll also want to buy the connection kit of these PSU (if there is any) or make your own connection assembly to bridge the motherboard and the power module. One advantage of these units is, externally, you will barely notice the difference after changing the PSU's innards. This makes it particularly suitable for the Apple IIgs because, to keep the computer size small, the PSU is mounted in a peculiar way above the motherboard. This means the physical shape of the PSU has to remain the same or else it won’t mount inside the IIgs case like the original. However, if you decided to go this route, some of these modern designs could be difficult to come by and will set you back roughly USD50 to USD100 (per unit) plus shipping.
Modern technology is so amazing that now you could find open-frame switching PSUs so small that will fit nicely inside the original Apple II PSU's case, replacing the old PCB and circuit components alike, and with performance exceeding that of the original PSU in every respect. Of course you still want a quad voltage (±5V, ±12V specifically) unit to keeps things simple and reliable. Two examples are SDS60UQ02 (60 Watts) from XP Power and SBU60-401 (60 Watts) from Sinpro. They and others share a more-or-less common design known as the “SBU60” series. Other examples with bigger wattages are REL-70-4004 (70 Watts), GRN-80-4002 (80 Watts) and REL-110-4004 / GRN-110-4002 (110 Watts) from Integrated Power Designs; and VLT80-4000 (80 Watts), VLT100-4000 (100 Watts) from EOS Power. You’ll also want to buy the connection kit of these PSU (if there is any) or make your own connection assembly to bridge the motherboard and the power module. One advantage of these units is, externally, you will barely notice the difference after changing the PSU's innards. This makes it particularly suitable for the Apple IIgs because, to keep the computer size small, the PSU is mounted in a peculiar way above the motherboard. This means the physical shape of the PSU has to remain the same or else it won’t mount inside the IIgs case like the original. However, if you decided to go this route, some of these modern designs could be difficult to come by and will set you back roughly USD50 to USD100 (per unit) plus shipping.
Note 1 - Regarding such converters, the picoPSU from Mini-Box is a compact solution that uses high efficiency DC-to-DC voltage converters to remove the multi-voltage requirement of mini-ITX PCs, ... and perhaps our vintage “toys” too. Imagine powering your IIe or IIgs with a 15V power brick just like a IIc. With the right electronic parts available today, building such a power module for the desktop Apple IIs could make a nice project …
The Meanwell RQ-85B

The low
profile unit is much shorter than the original Astec unit but it’s about 10mm wider. I was skeptical at first about its dimensions but after some
measurements I found no problem fitting the unit inside the Apple IIe. A more
powerful (125 Watts) model, the RQ-125B, is also available if you needed or felt more comfortable with that
kind of power. It will also fit but, but being 40mm longer, the mounting could be a little trickier.

This general
purpose PSU uses a terminal block with screw-on clamps to secure the wirings and that
means NO SOLDERING is necessary. The unit has a pot for fine tuning the loaded
voltage (+5V only). You will need to install a power on/off switch because
there is none on the unit. Its metal case also has plenty of venting holes compared to none on the original Astec unit which in many cases causes overheating problems.

Starting
with a PC extension power cord (also known as IEC60320 C14 to C13 power cord), you
need the male end (C14) with the inlet like the one on your original PSU. The
female end (C13) could be salvaged and used as a regular power cord by
installing a bare plug for local electricity.

A power
switch rated at 250V, 10A with power on light will work nicely. Depending on
your preference, you may want a solderless version.

Now
carefully strip the outside insulation of the extension power cord near the
male end to expose the Earth (yellow and green), Neutral (blue) and Live
(brown) wires (or whatever colours they are in your region). Keep the Earth wire intact and cut the latter two to expose the
copper. Then install the power switch as in its instructions.

After
installing the power switch, cut the extension power cord at the desired length
and again strip the insulations of the Earth, Neutral and Live wire at the cut
end.

Then
remove the power plug and wire assembly from the original PSU by cutting the
wires near the PCB. You will need to open the PSU case to do this but this will
keep the wires at their maximum lengths in case you’ll need them later. (Please remember there could be dangerous voltages inside the PSU so it is wise to discharge it before opening the case.) Or you
could make your own with AMP part no. 1-640520-0 (housing),
641300-1 (contacts),
some color 18 AWG silicone wires and a crimping tool. When your plug-and-wire assembly is ready, strip the wire
insulations at the cut end for the next step.

I added
a 60mm x 60mm x 25mm DC 12V fan for improved air circulation inside the Apple
IIe. The fan will turn on whenever the PSU is on and it’s mounted on the bottom
pan with double-side adhesive tape. The noise level is very acceptable.

After
some fiddling, the unit is wired up and ready for mounting on the Apple IIe’s
bottom pan. I also thread-locked the screws to prevent loosening due to thermal cycling. The wire-terminal connections are:
Wire
Color (Connector Pin)
|
RQ-85B Terminal
Symbol
|
Reference
|
For
the power-supply-to-motherboard assembly
|
||
Orange (pin 3)
|
+5V
|
+5V
|
Black
x 2 (pin 1, 2)
|
COM
|
Common
|
Yellow (pin 4)
|
+V2
|
+12V
|
Blue (pin 6)
|
V3
|
-5V
|
Green (pin 5)
|
-V4
|
-12V
|
For
the C14-inlet-to-power-supply assembly
|
||
Yellow-and-green
|
 |
Earth
|
Blue
|
N
|
Neutral
|
Brown
|
L
|
Live
|
For
the cooling fan
|
||
Red
|
+V2
|
+12V
|
Black
|
COM
|
Common
|

The PSU
is tied down to the Apple IIe’s bottom pan using four 2mm x 200mm nylon
cable ties. The latches are on the underside of the pan while the flexible
lengths go through the original mounting holes (for screws) and around the
venting holes on top of the PSU as shown. Make sure the four cable ties are
tightened evenly to hold the PSU tightly in place. I also checked that the metal bottom pan is in good electric contact with the PSU's bottom and so is earthed properly.

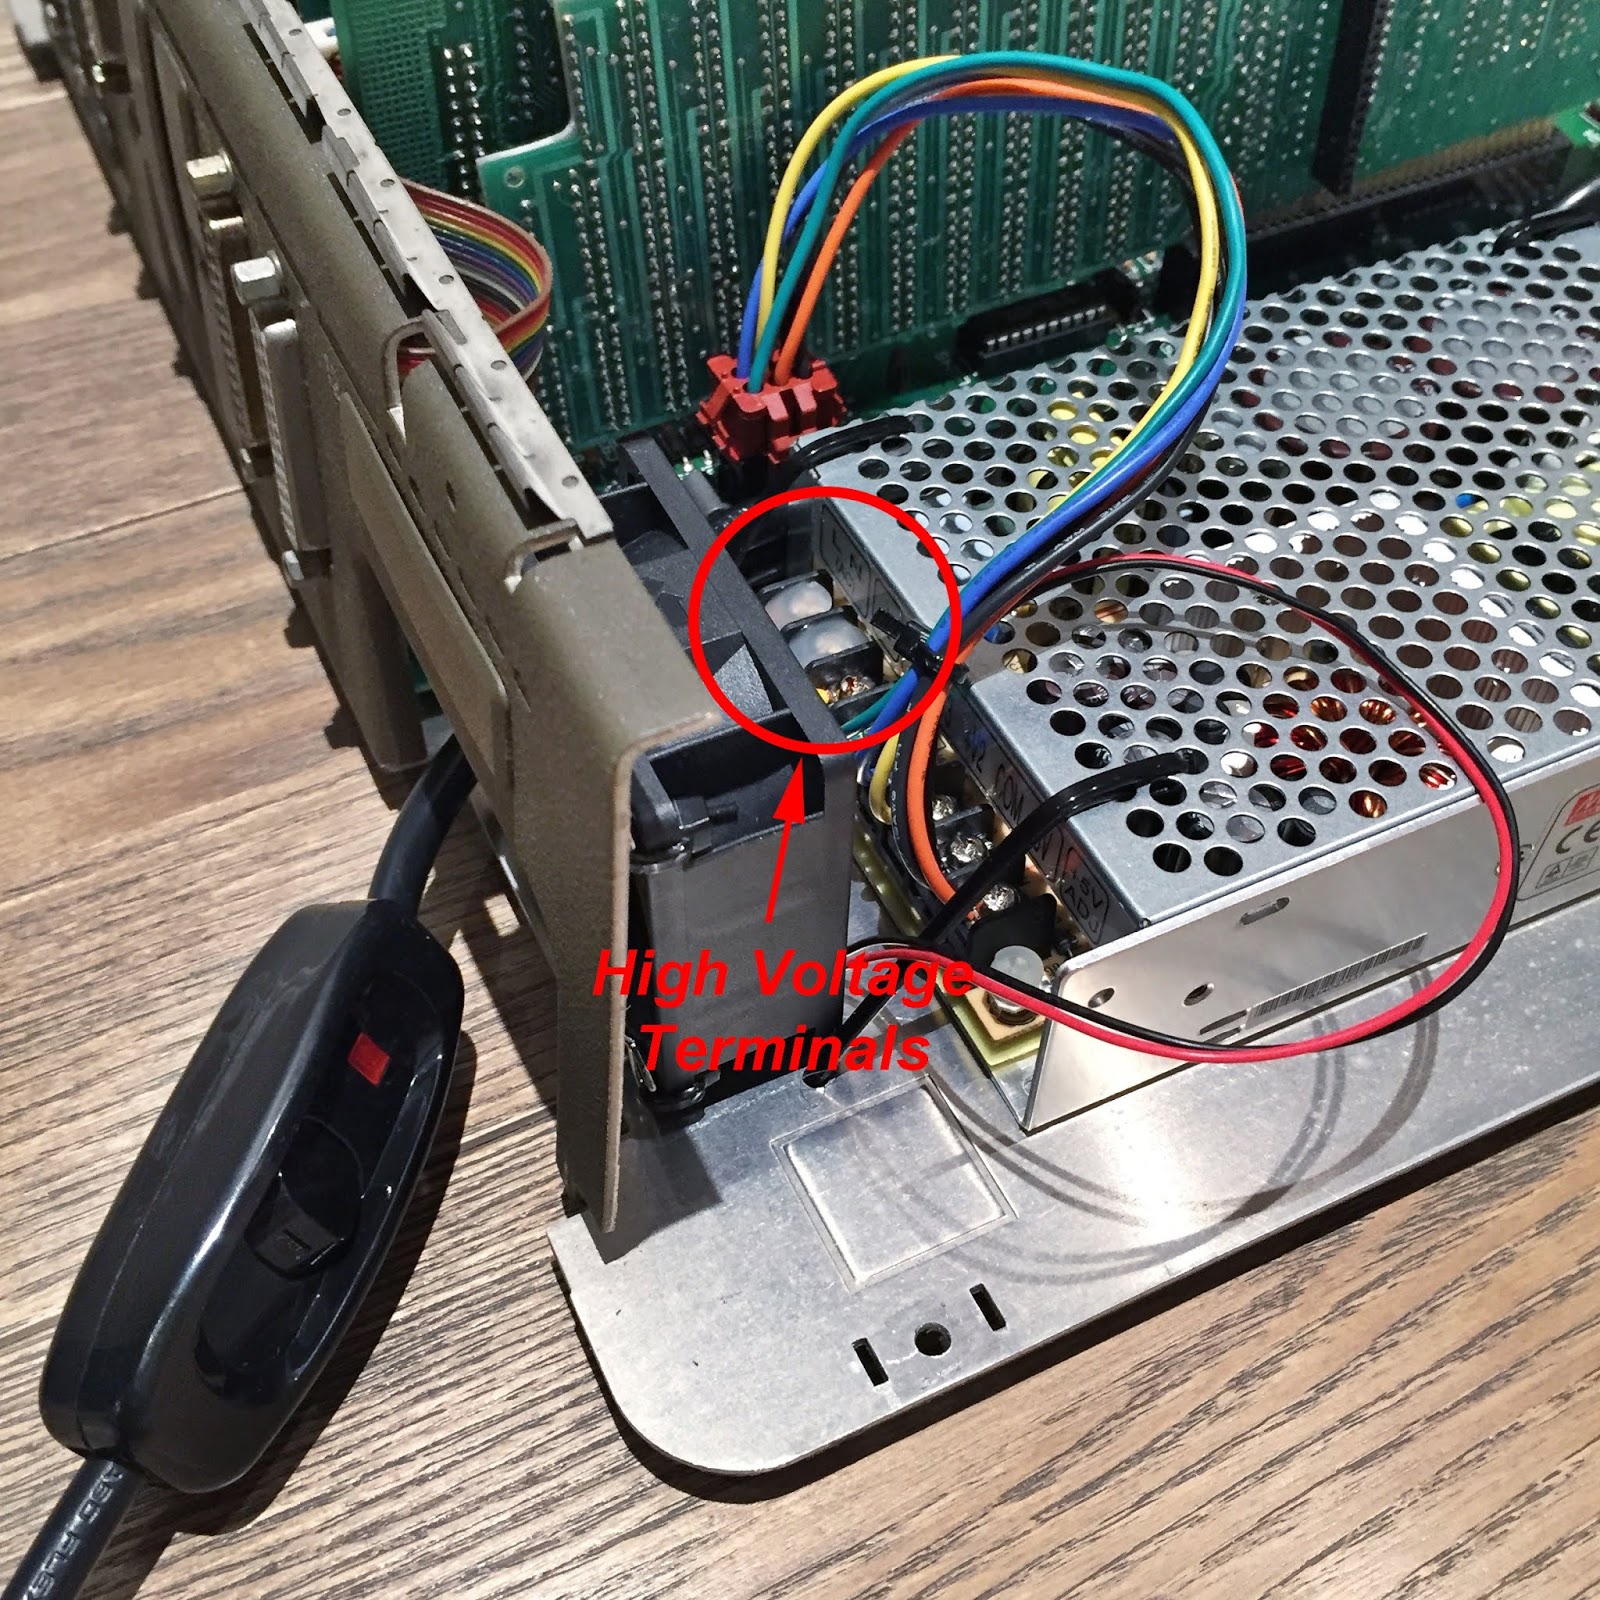
It’s a
good idea to seal the high voltage terminals (N and L) to prevent possible
electric shock. I used big globs of hot glue to do the job.

A
fan grill definitely improves the look and prevents the fan from being damaged
by external objects.

The
Apple IIe with the upper case back on. Plenty of space left for air
circulation.
Don’t
ask! I know you may have noticed. It’s not the original motherboard but from a
platinum Apple IIe :-)

View
from the back. The look may be somewhat different from the original but I wanted a “working” Apple IIe at minimal cost to start with. And after all it’s a clean and tidy solution for today's Apple IIes.

Here is
what the computer bottom looks like after excess lengths of the cable ties are removed. Absolutely NO DRILLING here!
All the
tools I have used were a screwdriver, a wire cutter and stripper, and a hobby knife.
I
believe this is as simple as it can be for an average Apple II hobbyist. Please enjoy!
Thank
you for visiting my blog!
Some good information related to this project are:
Some good information related to this project are:
- "Upgrading Apple II Powersupplies", SpeedyG, 2005
- "Replacement GS PowerSupply – Complete :-)", Drew ][, 2009
- “Reviews - Pico PSU Round Up”, jonnyGURU, 2010
- "Power Supply – Conversion", Lukazi, 2011
- “Apple IIe (1983)”, Oldcomputr, 2015
- "Universal PSU Kit", ReActiveMicro, 2016
- "Apple IIGS ASTEC Power Supply Repair", Apple IIoz, 2017
- “Replacing Line Filter Capacitors on an Apple IIGS or an Apple //e Power Supply”, Damn Technology, 2017
- “LittlePower Flip v3.0”, UltimateApple2, 2017
- “Commonly Failing Electronic Components (in vintage computers)”, Minus Zero Degrees
For a more elaborate setup, check out my second blog on this project!
ReplyDelete